Tutorial Flutter #4: Memahami Struktur Dasar Project Aplikasi Flutter

Kamu baru mulai belajar Flutter?
Berikut ini hal-hal dasar yang harus dipahami:
- Cara Instalasi Flutter dan SDK;
- Cara Menggunakan VS Code maupun Android Studio untuk coding Flutter;
- Struktur direktori project dan struktur dasar kode program Flutter.
Nah! khusus untuk bagian nomer 3, kita akan bahas di sini.
Struktur direktori project dan struktur dasar kode program Flutter sangat penting kita pahami, agar tidak bingung nanti saat membuat aplikasi Flutter.
Baiklah mari kita mulai…
Struktur Direktori Project Flutter
Ini adalah struktur direktori project Flutter:

Penjelasan:
- 📁
androidberisi source code untuk aplikasi android; - 📁
iosberisi source code untuk aplikasi iOS; - 📁
libberisi source code Dart, di sini kita akan menulis kode aplikasi; - 📁
testberisi source code Dart untuk testing aplikasi; - 📄
.gitignoreadalah file Git; - 📄
.metadatamerupakan file yang berisi metadata project yang di-generate otomatis; - 📄
.packagesmerupakan file yang berisi alamat path package yang dibuat oleh pub; - 📄
flutter_app.imlmerupakan file XML yang berisi keterangan project; - 📄
pubspec.lockmerupakan file yang berisi versi-versi library atau package. File ini dibuat oleh pub. Fungsinya untuk mengunci versi package. - 📄
pubspec.yamlmerupakan file yang berisi informasi tentang project dan library yang dibutuhkan; - 📄
README.mdmerupakan file markdown yang berisi penjelasan tentang source code.
Struktur Dasar Kode Aplikasi
Saat kamu membuat project baru,
kode program awal yang akan kita dapatkan
pada main.dart akan seperti ini:
import 'package:flutter/material.dart';

void main() => runApp(MyApp());

class MyApp extends StatelessWidget {
  // This widget is the root of your application.
  @override
  Widget build(BuildContext context) {
    return MaterialApp(
      title: 'Flutter Demo',
      theme: ThemeData(
        // This is the theme of your application.
        //
        // Try running your application with "flutter run". You'll see the
        // application has a blue toolbar. Then, without quitting the app, try
        // changing the primarySwatch below to Colors.green and then invoke
        // "hot reload" (press "r" in the console where you ran "flutter run",
        // or simply save your changes to "hot reload" in a Flutter IDE).
        // Notice that the counter didn't reset back to zero; the application
        // is not restarted.
        primarySwatch: Colors.blue,
      ),
      home: Center(child: MyHomePage(title: 'Aplikasi Flutter')),
    );
  }
}

class MyHomePage extends StatefulWidget {
  MyHomePage({Key key, this.title}) : super(key: key);

  // This widget is the home page of your application. It is stateful, meaning
  // that it has a State object (defined below) that contains fields that affect
  // how it looks.

  // This class is the configuration for the state. It holds the values (in this
  // case the title) provided by the parent (in this case the App widget) and
  // used by the build method of the State. Fields in a Widget subclass are
  // always marked "final".

  final String title;

  @override
  _MyHomePageState createState() => _MyHomePageState();
}

class _MyHomePageState extends State<MyHomePage> {
  int _counter = 0;

  void _incrementCounter() {
    setState(() {
      // This call to setState tells the Flutter framework that something has
      // changed in this State, which causes it to rerun the build method below
      // so that the display can reflect the updated values. If we changed
      // _counter without calling setState(), then the build method would not be
      // called again, and so nothing would appear to happen.
      _counter++;
    });
  }

  @override
  Widget build(BuildContext context) {
    // This method is rerun every time setState is called, for instance as done
    // by the _incrementCounter method above.
    //
    // The Flutter framework has been optimized to make rerunning build methods
    // fast, so that you can just rebuild anything that needs updating rather
    // than having to individually change instances of widgets.
    return Scaffold(
      appBar: AppBar(
        // Here we take the value from the MyHomePage object that was created by
        // the App.build method, and use it to set our appbar title.
        title: Text(widget.title),
      ),
      body: Center(
        // Center is a layout widget. It takes a single child and positions it
        // in the middle of the parent.
        child: Column(
          // Column is also layout widget. It takes a list of children and
          // arranges them vertically. By default, it sizes itself to fit its
          // children horizontally, and tries to be as tall as its parent.
          //
          // Invoke "debug painting" (press "p" in the console, choose the
          // "Toggle Debug Paint" action from the Flutter Inspector in Android
          // Studio, or the "Toggle Debug Paint" command in Visual Studio Code)
          // to see the wireframe for each widget.
          //
          // Column has various properties to control how it sizes itself and
          // how it positions its children. Here we use mainAxisAlignment to
          // center the children vertically; the main axis here is the vertical
          // axis because Columns are vertical (the cross axis would be
          // horizontal).
          mainAxisAlignment: MainAxisAlignment.center,
          children: <Widget>[
            Text(
              'You have pushed the button this many times:',
            ),
            Text(
              '$_counter',
              style: Theme.of(context).textTheme.display1,
            ),
          ],
        ),
      ),
      floatingActionButton: FloatingActionButton(
        onPressed: _incrementCounter,
        tooltip: 'Increment',
        child: Icon(Icons.add),
      ), // This trailing comma makes auto-formatting nicer for build methods.
    );
  }
}
Panjang sekali…
Sebenarnya kode ini sangat sederhana, yang membuat ia panjang adalah komentar-komentarnya.
Struktur kode di atas sebenarnya terdiri dari tiga bagian:
- Bagian import;
- Bagian main;
- Bagian widget.
Mari kita lihat contoh kode yang sama.
import 'package:flutter/material.dart';

void main() {
  runApp(HomePage());
}

class HomePage extends StatelessWidget {
  build(context) {
    return MaterialApp(
        home: Scaffold(
          appBar: AppBar(
              backgroundColor: Colors.teal,
              leading: Icon(Icons.home),
              title: Text('Aplikasi Flutter Petani Kode')
          ),
        )
    );
  }
}
Coba perhatikan!
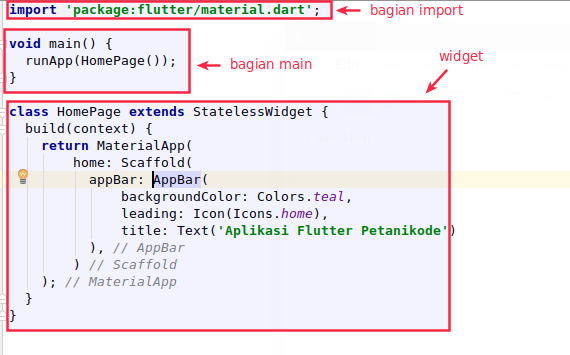
1. Bagian Import
Bagian import adalah tempat kita mendeklarasikan atau mengimpor library yang dibutuhkan pada aplikasi.
2. Bagian Main
Bagian main adalah fungsi utama dari aplikasi yang akan menjadi entri point. Fungsi ini akan dieksekusi pertama kali saat aplikasi dibuka.
3. Bagian Widget
Bagian widget adalah tempat kita membuat widget. Aplikasi Flutter sebenarnya terdiri dari susunan widget. Widget bisa kita bilang elemen-elemen seperti Tombol, Teks, Layout, Image, dan sebagainya.
Sebuah widget dapat berisi widget.
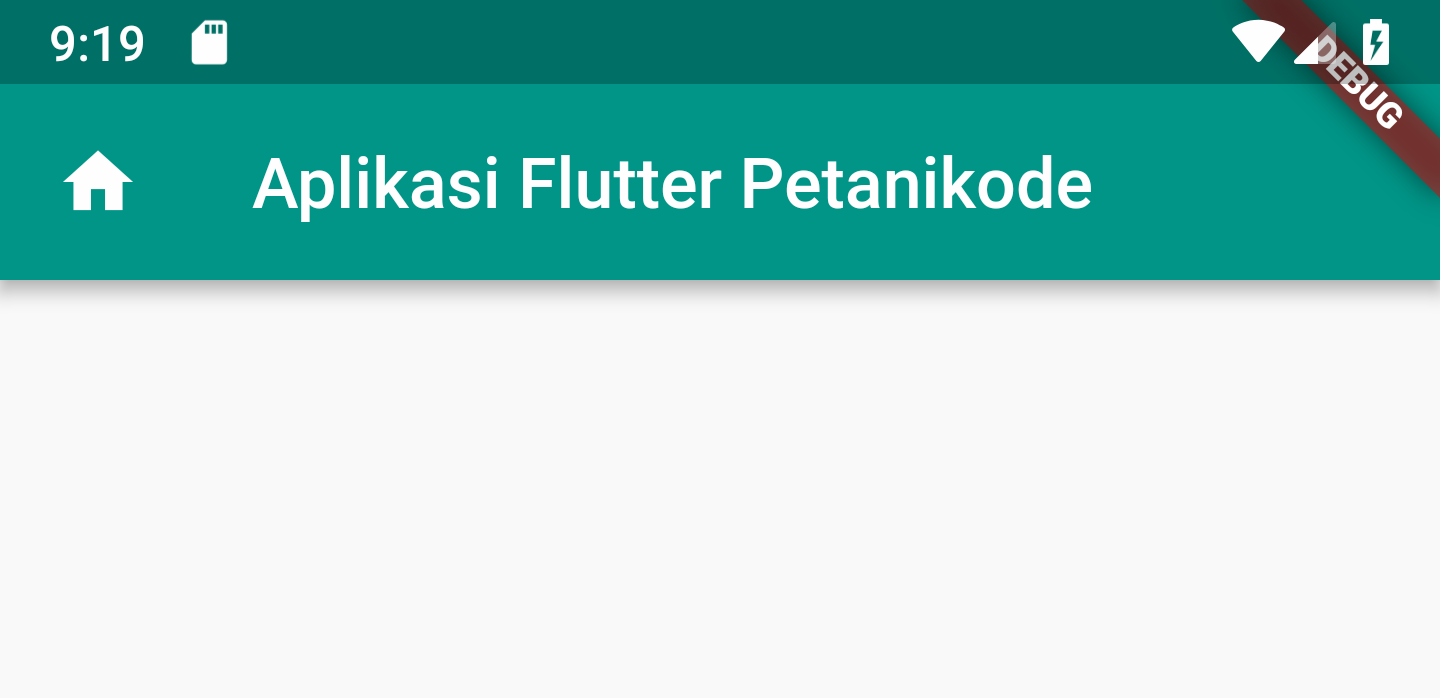
Pada kode program di atas, kita menggunakan beberapa widget yang tersusun seperti ini:

Pada aplikasi akan ditampilkan seperti ini:
Apa Selanjutnya?
Kamu sudah memahami struktur project dan struktur kode aplikasi Flutter. Selanjutnya, kamu bisa mulai membuat aplikasi Flutter.
Silakan lanjutkan ke:
- Mengenal Widget pada Flutter
- Membuat Aplikasi Flutter Pertama